Commission Web Editor Guide
What's New?
The AMS Commission sites are getting a new look this spring! Along with changes to the appearance of the site, there are some minor changes to the editing process as well.
- Linked social media icons can now easily be added to Board and Committee pages. (See Social Media Icons)
- Web Editors are able to upload files and images to board and committee sites.
- Board and committee chairs and co-chairs will automatically be added as web editors upon their first sign-in to Mura. To add additional web editors, chairs can fill out this form.
- New site-wide banner image for each AMS commission.
- Associate Images will now be presented as banner images by default. (See 'Banner Images')
Table of Contents
-
Getting Started
-
Inline Edit
- Editing Text
- Adding Pictures
- Adding Links
-
Full Edit
- Titles
- Summary
- Banner Images
- Moving Content
- Social Media Icons
-
Tree View
- Content types: Files, Folder, and Links
- Adding New Content
- Display and Nav
- Updating PDFs
- Configuring Folders
-
Contacts and Resources
Getting Started:
Go to any page on your commission's website. There will be an orange “Log In” text in the upper navigation bar.
Once signed in, you will be brought back to the the page you logged in on. Now that you are logged in, a dark grey toolbar will appear across the top of the page. This is the front-end toolbar.
There is a pencil to the left of the front end toolbar. When hovering over this, you will see the two modes that can be used to edit content in Mura: inline edit, and full edit.
Inline Edit
In inline edit mode you can organize a page’s content and make simple edits. To enter inline edit mode, hover over the pencil in the front-end toolbar, and select “Inline Edit”
.png)
Editing Text
To edit text in inline edit mode, you can double click any text on the page. Upon double clicking, the text editor toolbar will appear (see below), and you will be able to make edits directly to the text.
.png)
To add text to a page that does not yet have content, you can hover your cursor over the page until you reach a section highlighted as “body” and click that section. You will then be able to add text to the page.
Once you have finished making changes to the page, click the blue "Save" button in the upper-left corner, and then select "publish."
Adding Images
When adding a single picture to a page, it is often simplest to add a banner image from full edit mode (see "Banner Image' for instructions on how to do this.) However, if you are adding more than one image to page, or want more control over the size and formatting of your image, it can be best to do so in inline edit mode.
To add an image, select the image button in the toolbar of a new or existing text box. (see below). This will open the Image Preferences window.
.png)
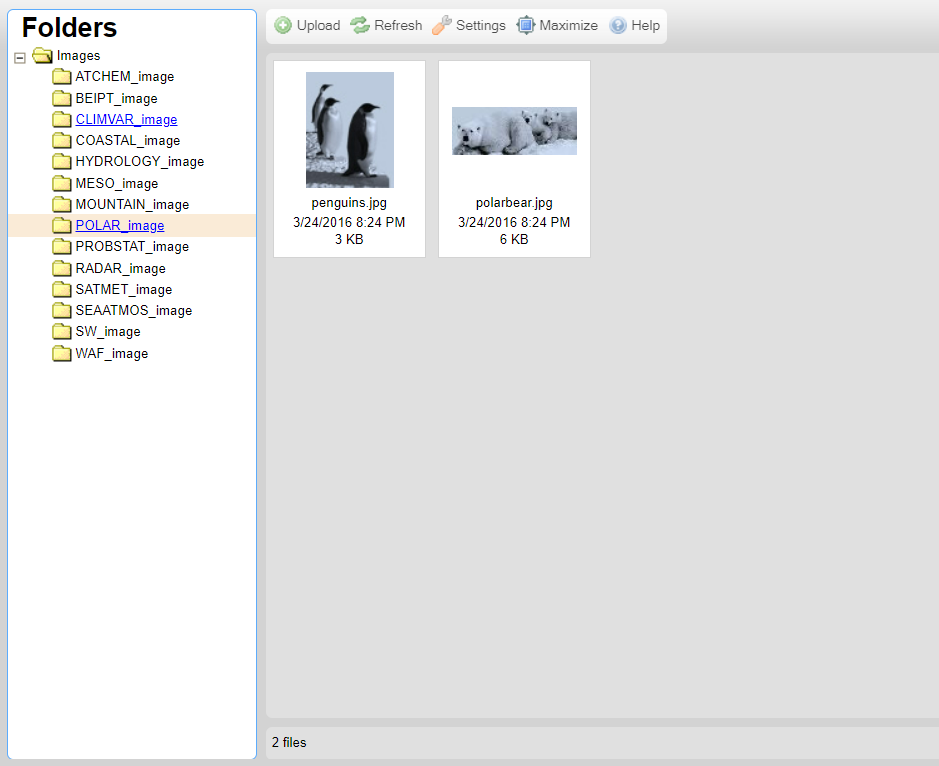
To select or upload an image, select the “Browse Server” button in the "Image Preferences" window. To upload a new image, select the upload button towards the top-left of the window.(below) Previously uploaded images can be selected from the list of folders to the left of the window. Please only use the folder that corresponds to the board or committee site you are editing.
Once added to the page, you can edit an image by simply double clicking it in full edit mode.
Adding Links
Links can be added within the text editing toolbar as well. First, highlight the text that you want to link, and select the Link button in the toolbar (see below).
.png)
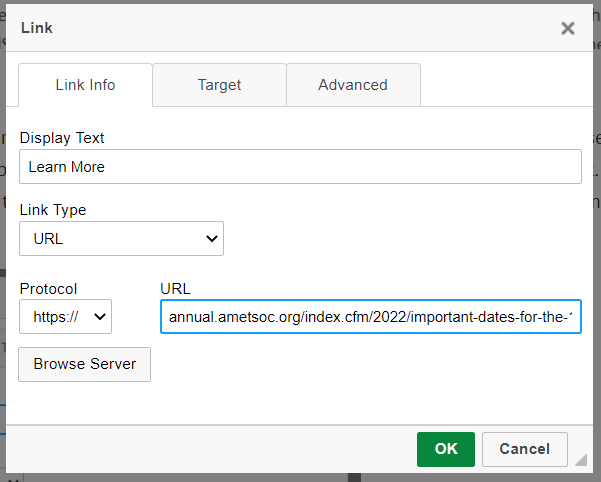
A window will appear in which you can enter the link’s destination address the URL field and select "OK"(see below). If linking to a page within the AMS site, DO NOT use the full URL, start from /commissionsiteurl/ onwards.
If you want the link to open in a new browser tab, go to the "target" tab at the top of the window and select “New Window” from the dropdown and select "OK." Generally, off-site links should open in a new tab.
Full Edit
To Enter Full Edit, hover over the pencil that is to the left of the Front End Editor toolbar and select 'Full Edit.' The Full Edit window will appear.
.png)
Editing Titles
You are able to title pages in full edit mode. Below the “Title” field, there is a button that reads “Show Additional Title Fields.” Selecting this button will reveal three additional title fields, all of which are optional.
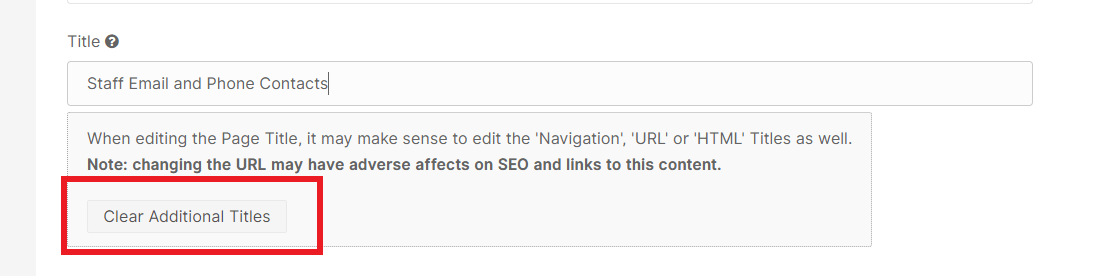
When titling a new page, these additional titles will be generated automatically, so it is often simplest to ignore these additional title fields. It is important to note, however, that when changing a page title, these additional titles will not be updated automatically. Because of this, it is best practice to clear all additional title fields when editing a page’s title. This can be done manually, or by selecting the "Clear Additional Titles" button, which appears while making changes to a title (see below). When completed, scroll to the bottom of the Full Edit window, and select “Publish"
Summary
The summary section is an optional field where you can include a brief summary of a page’s content. The summary will not appear directly on the page, but folders can be configured to display pages' summaries. Because of this, the summary field can usually be left empty unless you plan on including the page in a folder. See Creating and Configuring Folders
Banner Images
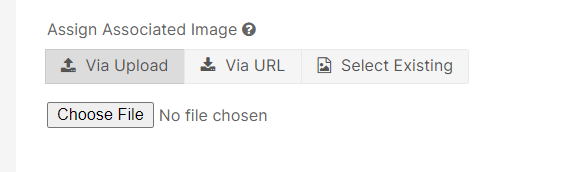
The "assign Associated Image" field can be used to add a banner image to the top of a page. The banner image will be automatically sized and displayed above the body content of a page. To add an associated image, go to the "Assign Associated Image" field in the Full Edit window. You will see three tabs: “Via Upload” will allow you to select an image from your computer to upload to the site, "Via URL" will allow you to enter an image URL, and “Select Existing” will reveal a search bar which can be used to select images that have already been uploaded to the commission site.
Moving Content
Click on the 'Publishing' tab, and scroll down to the Content Parent: field and click on the "Select New Parent" button. Enter in keywords (title or content). If the correct parent doesn’t appear, try some variations on keywords. Select correct parent via the radio button, and click publish.
Social Media Icons
You can include links to your board or committee's social media profiles from Full Edit mode. Once added, these links will appear as a row of social media icons above the left-hand navigation. (Below, left). To do this, simply scroll down to the "Committee or Board Profile" section of the Full Edit screen, and paste the URL of your social media profiles into the appropriate fields.

Tree View
In Tree View, you can create new web pages and other content for the website, as well as organize existing site pages. Tree View is a useful way of visualizing and organizing all of the website’s content. To enter Tree View, select the pictured icon to the left of the front end editor toolbar.

Within Tree View, you will see all of the site’s content arranged hierarchically. Note the “components” and “forms” tabs above the tree view. These buttons will allow you to view just the site’s components and forms respectively.
Selecting “list view” will show the same content listed, with the option of filtering and searching for site content.

Content Types
Pages are the most common kind of Mura content, but there are other types of content in Mura that can be added from Tree View.
Link:

This content type will allow you to include links in folders and navigation. When creating a link, simply title the link as you would a page, and enter the desired target URL into the "URL" field. If linking to a page within the AMS site, start the link immediately after "/index.cfm/."
File:
The file content type is most often used to add PDFs to the site. When a site user opens one of these files, they will be able to view and download the document from a web PDF viewer.
Folder:
Folders are useful for presenting like content together on the same page as a list or grid. A folder can contain multiple content types such as pages, files, and links. When viewing the folder, those items will be conveniently presented as a list or grid. See Configuring and Managing Folders
Adding Content
To add one of these content types to the site, you will need to first identify where you want this content located. You will need to locate the parent page or folder for the content in question, meaning the folder or page that your new content should fall directly beneath in the site’s hierarchy.
Locate the parent in tree view, and select the three dots to the far left of the listing. A dropdown will appear. Select “Add Content” in the dropdown menu.
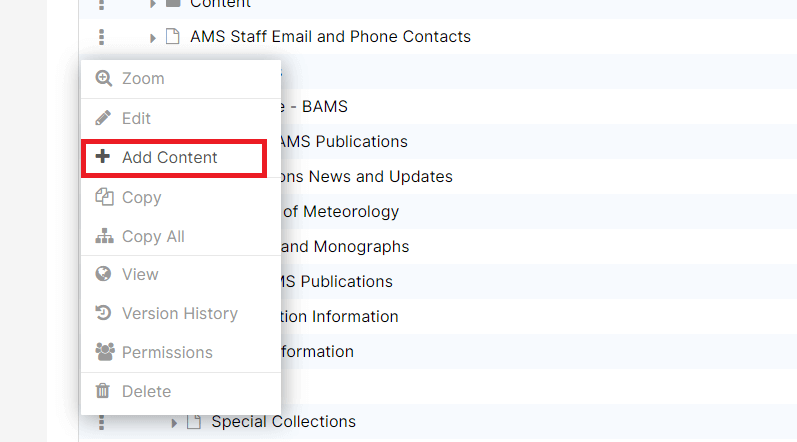
You will now be shown all of the possible content types you can choose from. Once you have made your selection, you will be taken to a Full Edit window from which you can title and edit the new content.
Display and Nav
Back in Tree View, you will see several settings to the right of each piece of content: Objects, Display, Template, and Nav. Display and Nav are the most important of these settings.

Display: Selecting the display button will reveal a dropdown with the options “Yes,” “No,” and “Per Schedule.” Yes is the default option. “Yes” simply means that site users and editors are able to view the page. “No” will make it so the page cannot be viewed by anyone, including editors. This option is useful for retiring old and defunct pages without deleting content. The "Per Schedule" will allow you to set a timeline for when the page should be displayed and hidden.
Nav: The Nav option will allow you to remove certain content from the website’s navigation. The default setting is “Yes,” meaning that the page is automatically listed in the site’s navigation. Pages set to “No” will remain accessible through direct links or search engines, but it will not be listed in the site’s navigation.
Both the Display and Nav settings can also be changed in the “Publishing" tab in Full Edit mode.
Updating PDFs
When uploading a updated version of a PDF, you should edit the existing file in Mura rather than creating a new file. This will ensure that the document's title and link remain the same on the AMS site.
To do this, first locate the file you want to update in Tree View. Selecting the file will bring you to the "Edit Content" screen. Under the "Select File to Upload" field, click browse to select the latest version of the PDF to upload from your computer. Select minor or major revision and then click the Publish button.
Reordering Navigation
From Tree View, you are able to change the order that navigation appears in. To do this, first locate the parent page of the content you want to reorder. Select the three dots to the left of the parent page and select "Zoom" from the dropdown menu.
Across the top of the section, you’ll see "Modify View". Under it, there is a Sort Navigation field. When reordering Navigation, make sure Sort Navigation is set to "Manual."
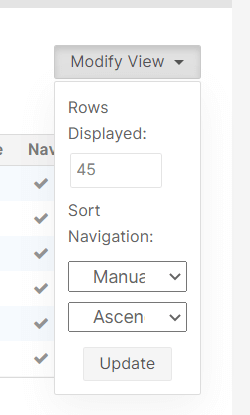 You can now click and drag the content into the order you would like it to appear in navigation. When done, select the "Update" button above the Tree View. The navigation should now reflect the changes you've made in Tree View
Creating and Configuring Folders
To create a folder, simply follow the steps outlined in Adding Content, and select “Folder” as your content type. Once you have created and titled your folder, there are several ways to add content to it.
You can find the folder in Tree View and select the three dots to its left. Select “Add content” and select the appropriate content type as outlined in Adding Content.
You can also use the steps outlined in "Moving Content" to add existing content to a folder.
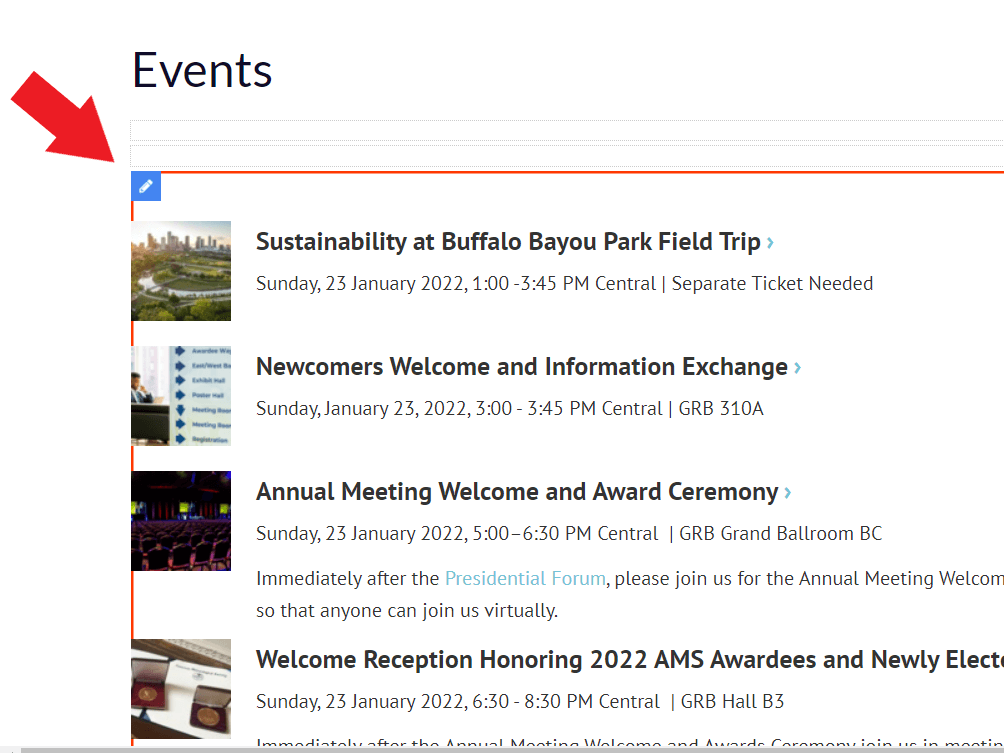
In inline edit, you can configure how your folder’s main page is presented. Once you’ve added content to your folder, you can view this page by selecting the three dots to the left of the folder in Tree view and selecting “View.” From there, enter inline edit mode, and hover over the area in which the folder’s item’s are listed. You will see a blue pencil in the folder’s upper-left corner (See below). Select this to open the folder toolbar on the right of the screen.
You can adjust how the folder is presented on this page with the Folder toolbar (below). You will see a dropdown menu labeled “layout,” which determines whether the folder’s items are displayed as a list or as a grid.
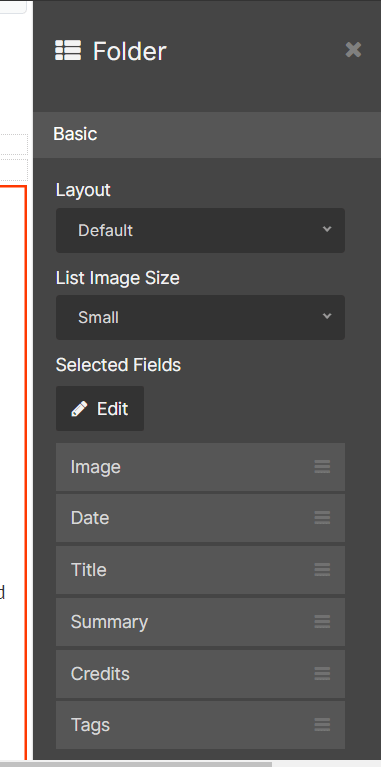
Further down, there is a “Selected Fields” option. This field determines what information users can and cannot see from the folder’s main page. To edit these fields, click the “edit” button above the selected fields in the Folder toolbar. This will open up a screen on which you can click and drag fields from left to right or vice versa. The fields on the right will be displayed on the folder’s main page.
Contacts and Resources
For any questions about web editing and Mura: Peter Killelea; [email protected]
To update or change a member's name and information on a board or committee's "Membership" page: [email protected]
If a member is missing from a board or committees "Membership" page: Contact your current Commissioner.
To add a board or committee member as a web editor: Complete this form